While there are great expectations for vSphere 6.5; we are still taking care of a number of 5.5 sites. This is just a reminder to check on the deploypkg.dll before the 5.5 update 3e upgrades.
Tag Archives: vCenter
VMware announces vSphere 6.5!
Today at VMworld Europe, VMware announced vSphere 6.5. This highly anticipated release promises to deliver on several key features and components that have been in the works for some time. Among the anticipated features are native backup and restore of the vCenter 6.5 appliance, the HTML 5 vSphere Client, native HA for the vCenter 6.5 appliance, Update Manager integrated with the vCenter 6.5 appliance. This release also brings VMotion encryption, VM disk level encryption, vSphere integrated Containers, major enhancements to DRS, dramatic improvements to API and automation capabilities with enhancements to REST APIs and CLI’s as well as improvements to the logs and integrated GUI for Auto Deploy, to name a just a few.
For more information on the vSphere 6.5 announcements visit VMware’s vSphere Blog posts:
Introducing vSphere 6.5
What’s New in vSphere 6.5: vCenter Server
What’s new in vSphere 6.5: Security
What’s New in vSphere 6.5: Host & Resource Management and Operations
The vSphere 6.x product page at VMware.com also highlights the product versions and licensing:
vSphere and vSphere with Operations Management
With VMworld Europe 2016 underway, expect more announcements from VMware.
VMware KB: VMware Platform Services Controller 6.0 FAQs
VMware KB: VMware Platform Services Controller 6.0 FAQs.
This is a terrific FAQ for the vSphere 6 PSC. I suggest you read this and refer to it as you begin to get more familiar with and plan upgrades or deployments of vSphere 6.
VMware KB: Installing or upgrading vCenter Server 6.0 using an external Platform Service Controller prompts the user to accept the Platform Services Controller Certificate
VMware KB: Error when uploading files to vCenter Server Appliance using WinSCP
VMware KB: Error when uploading files to vCenter Server Appliance using WinSCP.
This KB article describes how to set the default shell for “root” to bash to facilitate file operations on vCenter 6.x virtual appliances.
VMware KB: Default behavior of DRS has been changed to make the feature less aggressive
VMware KB: Default behavior of DRS has been changed to make the feature less aggressive.
VMware has released vCenter Server 5.5 Update 2 version D today. In the release notes, VMware called out that a new configuration parameter has been added to adjust DRS aggressiveness when a host is going into maintenance mode.
VMware KB: Unable to open a virtual machine console using the vSphere Web client in VMware vCenter Server 5.5 update 2
This KB article restates an item from the vCenter 5.5 Update 2 release notes:
Virtual machines with HTML 5 console in vSphere 5.5 open connections with http:// instead of https://
When the HTML 5 console is launched on a virtual machine, it uses connections like http:// and web sockets like ws:// instead of secure connections like https:// and wss://.This release resolves the issue by launching the virtual machine console with secure connection over port 7343 instead of the connection over port 7331.
This was a welcome change, but it introduces a potential connectivity issue for those who don’t read the release notes!
Here is a link to the release notes: https://www.vmware.com/support/vsphere5/doc/vsphere-vcenter-server-55u2-release-notes.html#networkingissues
Here is the top level KB article for required TCP and UDP ports for vSphere products. Notice the left hand column where the version numbers are listed!
TCP and UDP Ports required to access VMware vCenter Server, VMware ESXi and ESX hosts, and other network components
vSphere Client 5.5 Update 2 now has the capability to edit VMs with VM hardware version 10
With the release of vSphere 5.5 Update 2 last week, the vSphere client now has the ability to edit the properties of VMs with hardware compatibility level set to version 10.
With previous versions of the vSphere Client ( aka as the “C# Client”), the following error message is displayed when you attempt to edit a VM with hardware version 10:
You cannot use the vSphere client to edit the settings of virtual machines of version 10 or higher. Use the vSphere Web Client to edit the settings of this virtual machine.
The VMware vSphere Blog article: http://blogs.vmware.com/vsphere/2014/09/using-vsphere-5-5u2-client-edit-settings-virtual-machines-version-10-higher.html describes the capabilities and includes a link with a typo for the following KB article: http://kb.vmware.com/kb/2061336.
For more information on the resolved and known issues with vCenter 5.5 Update 2, see the release notes at: https://www.vmware.com/support/vsphere5/doc/vsphere-vcenter-server-55u2-release-notes.html
Upgrading vCenter Server to 5.5 in my lab – part5
Upgrading Update Manager
Read the following KB article:
Upgrading to vSphere Update Manager 5.5 on a Microsoft Windows platform (2058423)
Upgrade procedure:
Mount the vSphere 5.5 installation media. The installation wizard appears.
In the left pane, under VMware vCenter Support Tools, click vSphere Update Manager and then click Install.

Note: If any of the prerequisites are not met, they are listed in the right pane under Prerequisites.
Select the appropriate language from the dropdown and click OK.
If a previous version of vSphere Update Manager is already installed, the installer displays the message:
An earlier version of VMware vSphere Update Manager is already installed on this computer. Click OK to upgrade to 5.5.0

Click OK.
In the welcome screen, click Next.

Review the End User License Agreement. If you agree, select the I accept the terms in the license agreement option and click Next.
Optionally, select the Download updates from default sources immediately after installation option and click Next.

Note: This option automatically checks for downloading updates. If you want to review the default download sources or configure vSphere Update Manager to use a shared repository, deselect this option.
Enter the vCenter Server URL and a username and password and then click Next.

Notes:
If the Fully Qualified Domain Name (FQDN) or IP address of the vCenter Server and/or the username are not auto-populated, enter the FQDN and/or username manually.
Ensure that the username entered has a minimum of Register extension privilege to be able to register vSphere Update Manager with vCenter Server.
When prompted, enter the database user name and password for the existing database and click Next.

Select one of these options when prompted with a database upgrade warning:

Upgrade existing Update Manager database
Note: You must acknowledge that a backup has been taken of the Update Manager database.
Do not upgrade the existing Update Manager database
Click Next.
Optionally, from the dropdown, select either the IP address or the FQDN of vSphere Update Manager and then, check if the alternative TCP port numbers for the SOAP, Web, and SSL ports of vCenter Server appear and then click Next.

Note from the KB article: These fields are automatically populated with the appropriate URL and port numbers if the service is installed in the current system. The default ports are 8084, 9084, and 9087 respectively. Ensure that vCenter Server and the ESXi/ESX hosts can resolve the vSphere Update Manager.
Note: The next few steps from the Upgrade procedure were not required in my upgrade. The settings from my previous installation were reused including the patch repository location.
Optionally, select the Yes, I have Internet connection and I want to configure proxy settings now option and click Next.
Provide the proxy server address and the proxy server port and then click Next.
Optionally, select the Authenticate proxy using the credentials below option if your proxy server requires authentication and then click Next.
Optionally, provide an alternative installation location and then click Next.
Note: If the current system does not have 120 GB of disk space available, a warning is displayed when you click Next. Click OK to acknowledge the warning.
In the Ready to Install screen, click Install to start the installation.

Installing…
When the installation completes, click Finish.

Installed programs shows the upgraded vCenter Update Manager:

Update Manager Client Plug-in Install
Connect the vSphere Client to a vCenter Server system with which Update Manager is registered.
Select Plug-ins > Manage Plug-ins.
In the Plug-in Manager window, click Download and install for the VMware vSphere Update Manager extension.

If you receive a security warning, click Run.

Choose the appropriate language.

On the Welcome screen, click Next.

Review the End User License Agreement. If you agree, select the I accept the terms in the license agreement option and click Next.
On the Ready to install page, click Install.

If you are prompted by User Access Control, Click Yes.
Installing…
Complete the Update Manager Client installation, and click Finish.

The status for the Update Manager extension is displayed as Enabled.
![]()
Click Close to close the Plug-in Manager window.
With vSphere Update Manager upgraded, I can now experiment with upgrading ESXi hosts from 5.1 to 5.5 automatically. There are still a few components left to upgrade, including the vSphere ESXI dump collector, the vSphere Syslog collector and vShere Auto Deploy. More posts to follow!
Upgrading vCenter Server to 5.5 in my lab – part 1
Upgrading vCenter Server 5.1 update 1 to 5.5 in my lab
Part 1
This past summer I had a student in one of my vSphere 5.1 Install, Configure and Manage courses who had attempted an upgrade from an earlier version of vSphere to 5.1 with disastrous results. This fellow was hopping mad and was not impressed by me asking him if he had read the upgrade guides or knowledgebase articles covering the proper sequence and compatibility issues he had encountered.
So with him in mind, I am documenting the process I followed to upgrade my lab vCenter Server and related components to vCenter Server 5.5.
My vCenter system is split between two windows 2008 R2 VMs. The vCenter server, SSO, Inventory service, ESXi Dump collector and vSphere Syslog Collector are on “vc5.mylab.local,” while the vSphere Web Client and vCenter Update Manager are installed on “app-01.mylab.local.” I have another Windows 2008 R2 VM running MS SQL Server 2008 R2 that handles the vCenter and Update Manager databases.
Here are the beginning software versions on my Windows 2008 R2 vCenter VM

In order to avoid the difficulties my former student encountered with a similar upgrade, check out the following before getting started with the upgrade:
VMware Product Interoperability Matrixes
Best Practices for vCenter Server Upgrades
Required Information for Installing or Upgrading vCenter Single Sign-On, Inventory Service, vCenter Server and the vSphere Web Client — Print this topic and use it as a worksheet for the upgrade and save it for later so you have the answers for the next upgrade!
Update sequence for vSphere 5.5 and its compatible VMware products (2057795)
Upgrade the various products in numerical order.

From the KB article:
Before you update the vCenter Server, disable vCenter Server from vCloud Director. Also ensure that you stop or disable other VMware services so that they do not communicate with vCenter Server during the update process.
In this article I will be running through the upgrade to vCenter Server 5.5 and its related products. The VMware KB article Methods of upgrading to vCenter Server 5.5 (2053130) describes the requirements for upgrading to vCenter 5.5. I will be following the order specified in the section “Upgrading components separately for vCenter server 5.5”:
- Upgrade vCenter Single Sign-On.
For more information, see Upgrading to vCenter Single Sign-On 5.5 on a Microsoft Windows platform (2058249). - Upgrade vSphere Web Client.
For more information, see Upgrading to vSphere Web Client 5.5 on a Microsoft Windows platform (2058265). - Upgrade vCenter Inventory Service.
For more information, see Upgrading to vCenter Inventory Service 5.5 on a Microsoft Windows platform (2058272). - Upgrade vCenter Server.
For more information, see Upgrading to vCenter Server 5.5 on a Microsoft Windows platform (2058275). - Upgrade vCenter Update Manager.
For more information, see Upgrading to vSphere Update Manager 5.5 on a Microsoft Windows platform (2058423).
Upgrading vCenter Single Sign-On
Read the KB article below:
Upgrading to vCenter Single Sign-On 5.5 on a Microsoft Windows platform (2058249)
Information Required for vCenter Single Sign-On Installation
Follow the steps outlined in this KB article to back-up the existing 5.1 SSO database:
Backing up and restoring the vCenter Single Sign-On (SSO) 5.1 configuration (2034928) (You will need the “old” SSO admin password for this.) You won’t need the password for the upgrade.
You need to make sure that forward and reverse DNS lookups return the correct information about your SSO server and the vCenter server. See DNS Requirements for vSphere.
Additionally, you need to check the SSL certificate subject name and the registry of the VM running Single Sign-on. In my case SSO and vCenter server are installed on the same VM.
The registry key to check is referenced in this KB article:
Upgrade from vSphere 5.1 to vSphere 5.5 rolls back after importing Lookup Service data (2060511)
Check the HKEY_LOCAL_MACHINE\Software\VMware, Inc.\VMware Infrastructure\SSOServer\FQDNIp registry key value:
- If the registry key value is an IP address, this issue might affect your system.
- If the registry key value is set to the FQDN value you see in the certificate, your system is not affected by this issue.
The installer will perform a prerequisite check, but it will not stop you from proceeding if the values do not match.
For example:

If there is a mismatch, you need to change the registry value to match the “Subject” name used for the SSL certificate.

Upgrade procedure:
Mount the vSphere 5.5 installation media.
Note: I prefer to browse the install media and launch the “autorun.exe” with the “Run as Administrator.”
If you are prompted by User Account Control, click Yes.
In the left pane, under Custom Install, click Single Sign-On Install and then click Install.

Note: If any of the prerequisites are not met, they are listed in the right pane under Prerequisites.
In the welcome screen, click Next.

If a previous version of vCenter Single Sign-On (SSO) is installed, you see this message in the welcome screen:
An earlier version of vCenter Single Sign-On is already installed on this computer and will be upgraded to vCenter Single Sign-On 5.5.0.
Review the End User License Agreement. If you agree, select the I accept the terms in the license agreement option and then click Next.
Review the Prerequisites check screen and then click Next.

The installer notifies that a previous version is detected and that Users, Groups, Solution Users, and Lookup Service artifacts will be migrated.
Click Next.

Select a deployment mode and click Next.

vCenter Single Sign-On for your first vCenter Server – Select this option to deploy your first SSO server. This server becomes the first SSO server in a new vSphere authentication domain.
After you select this option:
Provide a password for the SSO administrator user and click Next.

Note from the KB article: This dialog shows information related to a domain by the name vsphere.local. This is not a domain that is auto-detected within the existing environment, but a net new domain used internally by vSphere. The administrator@vsphere.local account performs the same function as the admin@System-Domain account in previous versions of vSphere. For more information about the administrator@vsphere.local account, see the vSphere Software Components section of the vCenter Server and Host Management Guide.
Provide a site name and click Next.
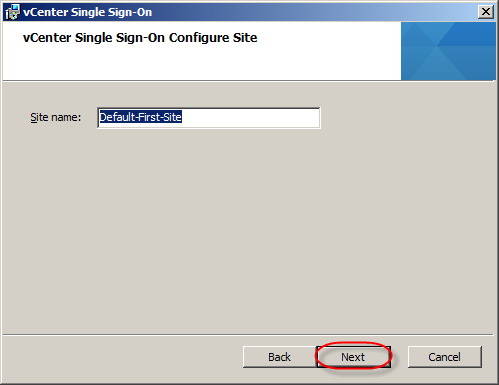
Note: The site name is used in environments where there are SSO servers in multiple sites. Ensure to select this name carefully because it cannot be changed in the vSphere Web Client after the installation completes. “Default-First-Site” is the default site name.
Optionally, provide an alternative installation location and then click Next. (I had previously installed SSO to the “D:” drive on my VM.)

Notes:
The installation requires 2 GB of disk space to be available.
In the vCenter Single Sign-On Information screen, click Install.

Installing…

When the installation completes, click Finish.

vCenter SSO 5.5 upgraded!

The first component is now upgraded. Next up is upgrading the vSphere Web Client to 5.5.
