VMware announces vSphere 6.5!

Today at VMworld Europe, VMware announced vSphere 6.5. This highly anticipated release promises to deliver on several key features and components that have been in the works for some time. Among the anticipated features are native backup and restore of the vCenter 6.5 appliance, the HTML 5 vSphere Client, native HA for the vCenter 6.5 appliance, Update Manager integrated with the vCenter 6.5 appliance. This release also brings VMotion encryption, VM disk level encryption, vSphere integrated Containers, major enhancements to DRS, dramatic improvements to API and automation capabilities with enhancements to REST APIs and CLI’s as well as improvements to the logs and integrated GUI for Auto Deploy, to name a just a few.
For more information on the vSphere 6.5 announcements visit VMware’s vSphere Blog posts:

Introducing vSphere 6.5
What’s New in vSphere 6.5: vCenter Server
What’s new in vSphere 6.5: Security
What’s New in vSphere 6.5: Host & Resource Management and Operations

The vSphere 6.x product page at VMware.com also highlights the product versions and licensing:

vSphere and vSphere with Operations Management

With VMworld Europe 2016 underway, expect more announcements from VMware.

Installing ESXi6 on VMware Workstation 11 – part 1

In my job I spend most of my days on-site with customers or in a classroom teaching for VMware. I have found it convenient to carry my lab with me. I have a laptop with a quad core i7, 32 GB of RAM and 1 TB combined of SSD and Hybrid drives. The laptop running VMware Workstation has made an effective mobile lab. AS it stands now, I have windows 2008 R2 and 2012 R2 domain controllers configured to provide AD, DNS, DHCP and CA services. Additionally I have a MS SQL 2012 server and vCenter 6 server. In this article I am going to go through the process I followed to deploy an ESXi 6 VM.

Creating a new VM for ESXi 6

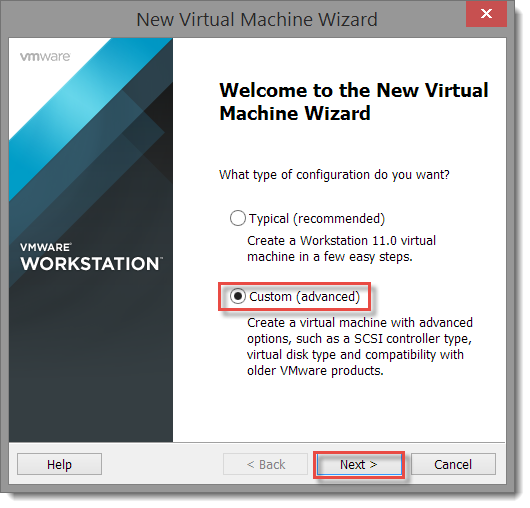
File > New Virtual Machine
esxi6-01
Select Custom and click Next >.

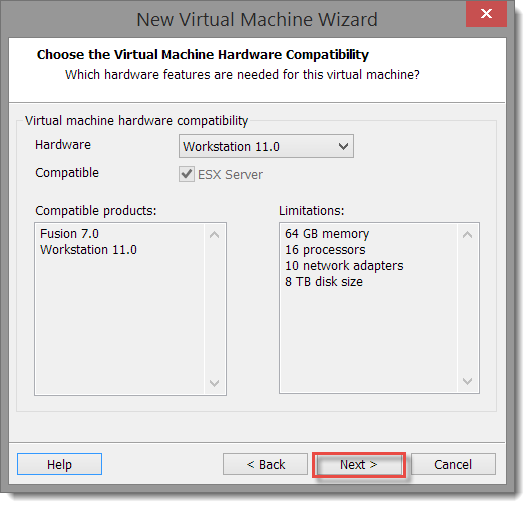
I chose Workstation 11.0 as the VM hardware compatibility level.
esxi6-02
Click Next >.

On the Guest OS Installation page, browse to your ESXi 6 ISO.
esxi6-03
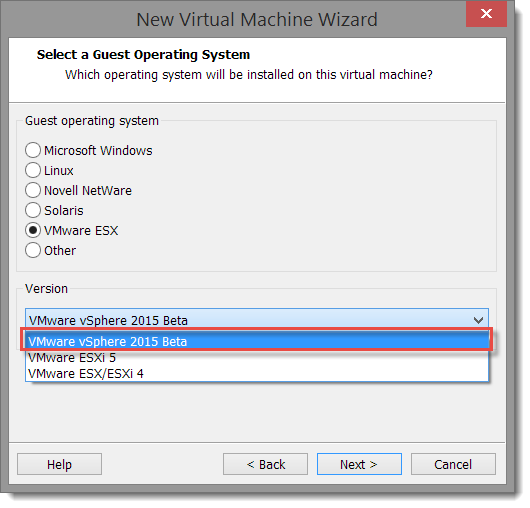
Click Next >. Notice that The OS was detected! If we chose I will install the operating system later, the next page in the wizard select ESX Server and VMware vSphere 2015 Beta for the version.

esxi6-04

On the Name the Virtual Machine page, enter your desired virtual machine name and verify the location. On my machine, I store my VMs on a separate drive.
esxi6-05

Click Next.

On the processor configuration page, I chose the preselected default of 2 CPUs with one core each.
esxi6-06
Click Next.

On the Memory for the Virtual Machine page, I kept the default of 4096 MB.
esxi6-07

Click Next.

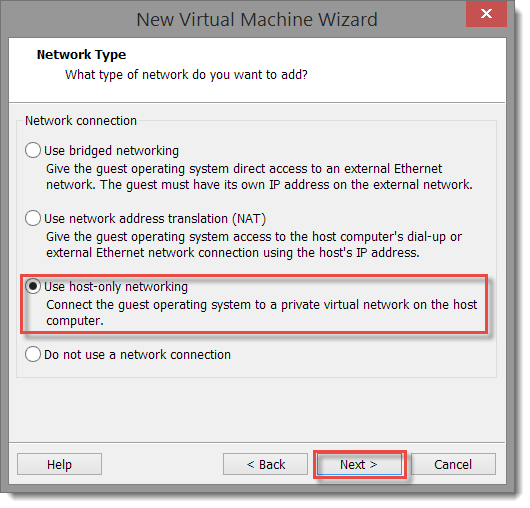
On the Network Type page, I selected Use host only networking so that the VM would get an IP address with existing management VM DHCP server and use the private DNS and AD that are already configured on a private vmnet.
esxi6-08
Click Next.
Accept the default selection of the LSI Logic adapter.
esxi6-09
Click Next.

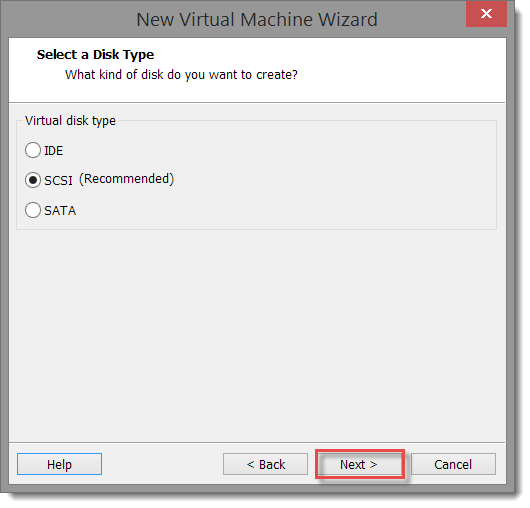
On the Select a Disk Type page, accept the default disk type of SCSI.
esxi6-10
Click Next.

On the Select a Disk page, accept the default: Create a new virtual disk.
esxi6-11
Click Next.

On the Specify Disk Capacity page, I took the defaults. I could have lowered the size to 5GB and still met the recommended minimum disk size for ESXi 6. Additionally, I kept the default Split virtual disk into multiple files.
esxi6-12
Click Next.

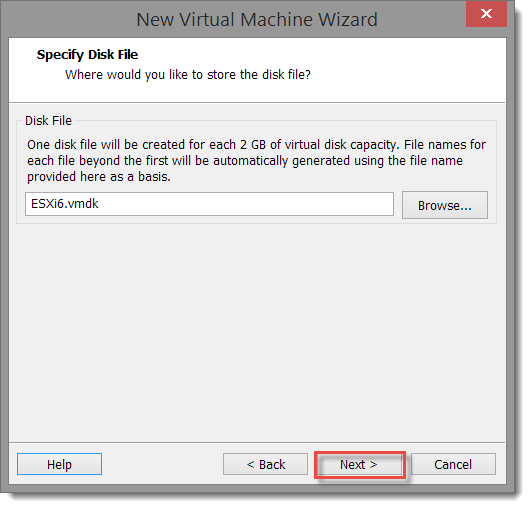
On the Specify Disk File page, accept the suggested file name (<VM display name>.vmdk).
esxi6-13
Click Next.

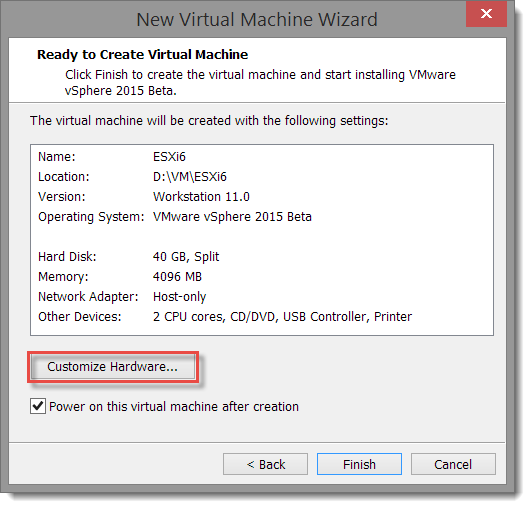
On the Ready to Create Virtual Machine page, I select Customize Hardware… so I can configure the VM’s NIC connection for the specific private vmnet I use for accessing management VMs and infrastructure services.
esxi6-14
On the VM’s Hardware page, I selected the CD/DVD device, then under Device status, I removed the check from the Connect at power on so I could power on the VM without starting the deployment of ESXi. This allows me to get the MAC address that is assigned to the VM’s NIC so that I can configure a DHCP reservation and the associated DNS A and PTR records.

esxi6-15
Click OK.

I select the Network Adapter from the device list. In the Network connection section, I select Custom then selected VMnet2 from the list (because my management systems are on VMnet2). Note that the Device status shows a checkmark for Connect at power on.

esxi6-16
Click Close.

Back on the Ready to Create Virtual Machine, I deselected Power on this virtual machine after creation so I could look at the contents of the .vmx file.
esxi6-17
Click Finish.

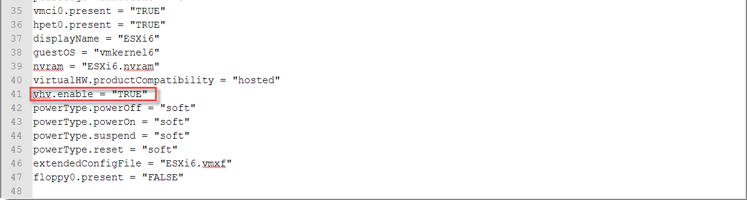
Browse to the location of the ESXi6.vmx file and open it for editing. (VMware KB 1714- Tips for editing a .vmx file)

esxi6-18a

Notice that the .vmx file already contains the vhv.enable = “TRUE” setting required to run 64-bit VMs in the nested ESXi host. Previously this required a manual addition to the file (VMware KB 2034803 – Installing ESXi in VMware Workstation).

Close the .VMX file, then power on the virtual machine.

esxi6-19

After powering on the VM, I reopened the .vmx file and recorded the MAC address – called “ethernet0.generatedAddress”:esxi6-20

Then I opened up my Windows DHCP server console and created a new DHCP reservation:esxi6-21
Configured lease:
esxi6-22

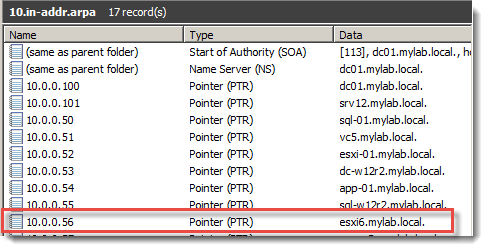
Then I created the DNS records

New Host record:
esxi6-23
esxi6-24

Check the reverse lookup record:
esxi6-26

Back in the virtual machine settings, select the CD/DVD and check the box next to Connect at power on so the ISO image will be mounted when we power the VM back on.

esxi6-27

That is it for part 1!. Next is the install and configuration of a ESXi 6

vSphere 6 Install, Configure and Manage web resources page

In preparation for teaching an early access vSphere: Install, Configure and Manage [v6] course this week, I have collected all the web resource links from the student manual onto a single page. Every web link is included, though none are repeated as they are in some sections of the course materials.

The web resources are here.

VMware KB: NSX for vSphere 6.1.3 is compatible with vSphere 6.0, but new vSphere 6.0 features have not been tested with NSX

VMware KB: NSX for vSphere 6.1.3 is compatible with vSphere 6.0, but new vSphere 6.0 features have not been tested with NSX.

We have been waiting for this update to be released since it was mentioned at PEX in February. Now to get it into the lab!

VMware KB: Configuring disks to use VMware Paravirtual SCSI (PVSCSI) adapters

The question of using the PVSCSI adapter in Windows Server templates comes up occasionally. The quoted VMware KB article has the VM and OS compatibility requirements as well as the steps to implement the driver.

For my purposes, I don’t recommend using the PVSCSI adapter for the OS disk. I prefer to maintain the highest level of compatibility with OS versions and possible use cases. For example, MS clustering is not supported.

I have seen improved VM disk performance when the PVSCSI adapter is used with applications that require higher IOPS.

VMware KB: Configuring disks to use VMware Paravirtual SCSI (PVSCSI) adapters.

New VMware vSphere Blog post on ESXi console lockdown

This week I am back in the classroom teaching a vSphere 5.5: Install, Configure and Manage class for VMware in Sacramento, CA. During the first few sections of the class, the ESXi user interfaces and basic configuration tasks are presented, including an overview of the tasks that can be accomplished with DCUI (Direct Console User Interface). The topic of lockdown mode is mentioned as well as how to configure an ESXI host to use Active Directory for user authentication and a little advice on user account best practices. As part of the discussion, I bring up the use of an “ESX Admins” group in Active Directory, the treatment of the Root user password as an “in case of emergency” item to be tightly controlled and the use of lockdown mode.

Today when I was leaving class, I was happy to see a new blog post from Kyle Gleed of VMware entitled: “Restricting Access to the ESXi Host Console – Revisiting Lockdown Mode” and in particular his 5 step recommendation on restricting access to ESXi with version 5.1 or later:

1. Add your ESXi hosts to Active Directory. This not only allows users to use their existing active directory accounts to manage their ESXi hosts, but it eliminates the need to create and maintain local user accounts on each host.

2. Create the “ESX Admins” Group in Active Directory and add all your admins as members to this group. By default, when an ESXi hosts is added to active directory the “ESX Admins” group is assigned full admin privileges. Note that you can change the name of the group and customize the privileges (follow the link for information on how to do this).

3. Vault the “root” password. As I noted above, root is still able to override lockdown mode so you want to limit access to this account. With ESXi versions 5.1 and beyond you can now assign full admin rights to named users so it’s no longer necessary to use the root account for day-to-day administration. Don’t disable the root account, set a complex password and lock it away in a safe so you can access it if you ever need to.

4. Set a timeout for both the ESXiShellTimeOut and the ESXiShellInteractiveTimeOut. Should you ever need to temporarily enable access the ESXi Shell via SSH it’s good to set these timeouts so these services will automatically get shutdown and idle SSH/Shell sessions terminated.

5. Enable Lockdown Mode. Enabling lockdown mode prevents non-root users from logging onto the host console directly. This forces admins to manage the host through vCenter Server. Again, should a host ever become isolated from vCenter Server you can retrieve the root password and login as root to override the lockdown mode. Again, be sure not to disable the root user . The point is not to disable root access, but rather to avoid having admins use it for their day-to-day activities.

Terrific advice and I appreciate the timing, I will definitely refer to this in class this week and in the future!


VMware KB: VMware vSphere 5 Memory Management and Monitoring diagram

While digging through VMware’s Knowledge Base for articles for a future blog post I ran across this and couldn’t wait to share.

This has the most brilliant diagram of the various memory management features and their instrumentation in the various interfaces available to vSphere admins.

VMware KB: VMware vSphere 5 Memory Management and Monitoring diagram.